
Despues del super lanzamiento de ayer en La Pareja Creativa, hoy toca estrenar el reto de Octubre! Y aqui esta mi tarjeta:

El reto de este mes consiste en inspirarse en esta foto otoñal:

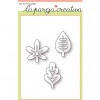
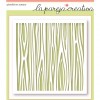
Podeis ver perfectamente en que me he inspirado... la madera, las hojas, los colores, la posición de los elementos... Y fue super facil recrealo con dos de los nuevos productos presentados ayer: los troqueles "Otoño Retro" y lo que va a ser nuestro producto del mes de Octubre (y que podeis comprar al 50%!!!!), el stencil "Madera":

Quería que la madera tuviera textura, asi que utilicé el stencil con pasta de embossing sobre cartulina gris. Este stencil es SUPER delicado, y tienes que tener mucho cuidado al utilizarlo. Para hacerlo un poco más facil he añadido un poco de pegamente reposicionable en la parte trasera del stencil, y así los piquitos rebeldes no se levantan al utilizarlo.
Eso si, tambien os aviso que al limpiarlo hay que tener muchisimo cuidado, pero es que queda tan bonito que merece la pena ;-)

Then I cut the leaves out of it, and glued them over the front of the card, giving dimension to some of the pieces. I used the "insides" of the leaves as well.
Para crear las hojas, he utilizado dos hojas de papel acuarelable. Sobre mi superficie de trabajo "frote" algunas tintas distress, con un spray añadí agua, y coloqué los papeles encima. Los sequé, y volví a repetir los mismos pasos una y otra vez hasta que me quedé contenta con el resultado final.
Entonces troquelé las hojas y las pegué sobre el frente de la tarjeta, dandole más dimensión a algunas de ellas. También he añadido los troquelados del interior de las hojas, como podeis ver en las fotos.

I hope you join us this month for the challenge and stop by the blog to see the amazing projects from the other DT girls:
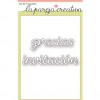
Para el mensaje, he troquelado el "gracias" de goma eva para que tuviera dimension y lo he pegado sobre las hojas.
Animaros a participar este mes en el reto y ahora pasaros por el blog para ver los trabajos de mi compis de DT:

¡Gracias por pasaros hoy por aqui! Un besito!
Supplies:
Productos Utilizados:


Qué bien te han quedado las hojas con todos esos colores y precisamente estaba pensando lo que has comentado del stencil, que con todos esos piquitos debía ser complicado que quede perfecto, pero a ti te quedo genial.
ReplyDeleteMuchas gracias Gemma! La verdad es que es super delicado y hay que usarlo con cuidado, pero por lo demas... queda tan bonito! ;-) Un besito!
DeleteEsta tarjeta es tan bonita que la enmarcaría y la colgaría en la pared. Las hojas te han quedado preciosas y la idea de usar la parte de dentro me parece genial. Estoy deseando que me llegue el pedido para ponerme a experimentar... Besotes
ReplyDeleteGracias guapisima! La verdad es que hay veces que te pones a experimentar, y me lo pasé tan bien haciendo esta tarjeta ;-) Y yo estoy deseando ver lo que se te ocurre hacer con los productos nuevos en cuanto te llegue el pedido. Muaksssss!
Delete