Hiyaaaa!
It's Thursday, so it's time for a new hop using this month's card kit from SSS. And here is today's card:
¡Holaaaa!
Es Jueves, asi que es hora de un nuevo salto de blogs utilizando el kit de este mes de SSS. Y aqui esta mi tarjeta:
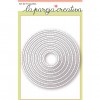
I still find that this kit is missing sentiments, but I decided to use the "dream" die again, adding a "BIG" to complete de message. I started by die cutting lots of times de "dream" from some of the papers from the kit. I cut the little tail from each word so they didn't take as much space and they could be closer together. To create the circle I used some masking paper, on the sticky side. I started glueing the die cuts over the masking paper so they stayed in place. Then using a circle die, I die cut the big circle. This way, all the words stay put, and I just had to turn it around, add the glue with a glue pen to each word, and add it to the front of a black card base (from the kit too). Then you just carefully remove the masking paper and cut any word that's hanging on the edge.
Aun encuentro este kit un poco pobre en el tema sentimientos, asi que decidí utilizar de nuevo el troquel de "dream", añadiendole un "BIG" para completar el mensaje. Comencé troquelando el "dream" varias veces de algunos de los papeles del kit. Les recorte el rabillo del final, para que no ocuparan tanto y las palabras quedaran mas juntitas. Para crear el circulo facilmente he utilizado papel de enmascarar (o papel tipo post it, con adhesivo no permanente). Fui pegando las palabras al reves sobre el papel de enmascarar, y así todas se quedan en su sitio a la hora de troquelar un circulo grande de ellas. Despues solo hay que darle la vuelta, añadir pegamento sobre las palabras troqueladas con un boli de pegamento y colocarlo sobre una tarjeta base negra (parte del kit). Ahora solo queda quitar el papel de enmascarar con cuidado y recortar las palabras que queden colgando en el lateral.

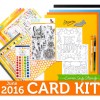
I wanted the "BIG" to stand out over the words, so I die cut it out of white cardstock, glued it over a circle of vellum and placed it over the die cut words. There's a rainbow paper in the kit that I love, and after cutting some of the words out of it, I had a small piece left that I decided to glue on one of the sides to give it a touch of color. And here is a picture of the complete kit, so you see all the cute products:
Queria que el "BIG" resaltara sobre las palabras troqueladas, asi que utilicé cartulina blanca, lo pegué sobre un circulo de vellum y lo coloque sobre los "dream". En el kit viene un papel con un arcoiris de colores que me encanta, y despues de troquelar algunas de las palabras de el, me sobraba una tira finita que decidí pegar en un lateral de la tarjeta para darle un toque de color. Y aqui os dejo una foto del kit completo, para que veais todos los productos tan chulos que trae:
And this is a hop, so don't forget to check out what the other girls made, and today we have a new girl, so make sure you go give her a huge welcome!
Y esto es un salto de blogs, asi que no os olvideis de pasar por los blogs de mis compis para ver lo que os han preparado, además hoy tenemos chica nueva, asi que pasaros y darle una buena bienvenida!
And that's all for today! Thanks for stopping by! xx
¡Y esto es todo por hoy! Gracias por haberos pasado por aqui! Besitos!!
Supplies:
Productos Utilizados:
Hi there!
Just wanted to stop by today and let you all know that I'm over at La Pareja Creativa with an interactive card. I tried to make a video for it, but my camera died half way through and I didn't realise :-( So, maybe next time!
I hope you stop by and give interactive cards a go ;-)
Holaaaa!
Solo queria pasarme por aqui hoy para comentaros que estoy en La Pareja Creativa con una tarjeta interactiva. Intenté hacer un video, pero la bateria murio a mitad de tarjeta y no me enteré :-( Asi que tendré que grabar la siguiente!
Espero que os paseis por alli y os animeis a probar con las tarjetas interactivas ;-)
Thanks for stopping by today! xx
¡Gracias por pasaros por aqui hoy! Besitoss!
Supplies:
Productos Utilizados:
Hiyaaaa!
Today we are back with a new hop using this month's card kit from SSS. And here is the card I made:
¡Holaaaa!
Hoy estamos de vuelta con un nuevo salto de blogs utilizando el kit de este mes de SSS. Y aqui esta mi tarjeta:
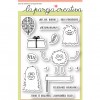
This time I wanted to use the BIG sentiment that comes in the stamp set, and I decided to use with it some of the papers from the kit. I went for a design with lots of dimension, where the sentiment is stamped in every layer, and they fit together like a puzzle.
I love how the papers go together perfectly, with those color splatters that add some green and pink to the card.
In this picture you can see all the layers better:
Esta vez queria utilizar el mensaje GRANDE que viene en el set de sellos, asi que decidí combinarlo con algunos de los papeles del kit. He utilizado un diseño con mucha dimension, en el que el mensaje esta estampado en varias capas que encajan como un puzzle.
Me encanta lo bien que combinan estos dos papeles, con esos salpicones que añaden algo de rosa y verde a la tarjeta.
En esta foto podeis ver mejor las capas:
I wanted to use some of the enamel dots from the kit, but the colors were too bright, so I used a permanent marker to color them black to match the sentiment. Then I placed them between the layers randomly. And here is a picture of the complete kit, so you see all the cute products:
Queria utilizar algunos de los enamel dots que vienen en el kit, pero los colores eran demasiado llamativos, asi que he utilizado un rotulador permanente para colorearlos de negro y que combinaran con el mensaje. Despues los he ido colocando entre las capas al tun tun. Y aqui os dejo una foto del kit, para que veais todas las cosas chulas que trae:
And this is a hop, so don't forget to check out what the other girls made, of course!
Y esto es un salto de blogs, asi que no os olvideis de pasar por los blogs de mis compis para ver lo que os han preparado, por supuesto!
And that's all for today! Thanks for stopping by! xx
¡Y esto es todo por hoy! Gracias por haberos pasado por aqui! Besitos!!
Supplies:
Productos Utilizados:
Today I'm over at La Pareja Creativa sharing a card with a video. I decided to make some "chocolate covered strawberries" and I love how they turned out!
Go check it out and let me know what you think ;-)
Hoy estoy en el blog de La Pareja Creativa con una tarjeta y un video. Decidí probar a hacer unas "fresas cubiertas de chocolate" y me encanta como han quedado!
Asi que pasaros por alli y decidme que os parece ;-)
You can watch the video on Youtube, if you prefer, just click HERE!
Thanks for stopping by and have a great weekend!
Tambien podeis ver el video en Youtube, si preferis, solo teneis que pinchar AQUI!
Muchas gracias por pasaros por aqui hoy y que tengais un finde estupendo!
Supplies:
Productos Utilizados:
Hiyaaaa!
It's time for a new card kit from SSS, and I couldn't wait to get my hands on this one, cause I looooove the stamp set. So here is the card I made for today's hop:
¡Holaaaa!
Ha llegado la hora de estrenar un nuevo kit de SSS, y estaba deseando pillar este, porque me chiflaaaaa el set de sellos. Asi que esta es la tarjeta que he hecho para el salto de blogs de hoy:
The only problem I see with this kit is the lack of sentiments, but I didn't want to grab something from an older kit or another company just yet, so I decided to use the die that comes in the kit.
I went for the faux embossed look by die cutting the word a million times, and then glueing them to the front of the same color card base. It gives the card great texture, and I like that the sentiment is not the focal point.
Then I stamped the flower and the leaves on watercolor paper and colored them with my ZIG Clean Color markers. Love how they blend!
El unico problema que le veo a este kit es que le faltan mensajes, pero no queria utilizar uno de otro kit o de otra compañia hoy, asi que me decidí por el troquel que viene en el kit.
He utilizado la tecnica del falso embossing, troquelando la palabra como un millon de veces y pegandolas en una base de tarjeta del mismo color. Le da un monton de textura, y me gusta que el mensaje no es el punto focal de la tarjeta.
Despues estampé la flor y las hojas en cartulina acuarelable y las coloreé con los rotus ZIG Clean Color. Me encanta lo bien que se difuminan!
In case you missed it, here is a picture of the complete kit:
En caso de que os lo hayais perdido, aqui os dejo una foto del kit completo:
And this is a hop, so don't forget to check out what the other girls made, of course!
Y esto es un salto de blogs, asi que no os olvideis de pasar por los blogs de mis compis para ver lo que os han preparado, por supuesto!
And that's all for today! Thanks for stopping by! xx
¡Y esto es todo por hoy! Gracias por haberos pasado por aqui! Besitos!!
Supplies:
Productos Utilizados: