Hiya!
I'm very busy today, cause I have to finish lots of crafty things for tomorrow, but while some stuff dries I thought I could share another card.
I have to say that I love this card and it was SO much fun to make. Everything in the card was cut with my silhouette and I used lots of distress inks to colour.
The background was a cloud background cut for the silhouette, that I covered with vellum, so it was a bit more subtle.
The greeting was done with rub on letters as I don't have a "happy Birthday" stamp in Spanish.
I then used some glossy accents on the balloons and stuck some googly eyes on the little monster. Very cute.
Hope you liked it and I better go finish everything!!
Hiya!
Today I'm sharing another of those birthday cards I talked about in the previous post.
For this card I used a technique I haven't used for a while. I dry-embossed the card using the cuttlebug and a sizzix folder. The result was very nice and I decided to give it some colour with distress inks. I cut the cake using the silhouette (as you can see, I'm addicted to it) and colour it with more distress inks. I used some perfect pearls on the "icing" to give it some shine. I raised the cake using pop dots and stamped the greeting with StazeOn.
Very simple and easy to do, and I have to take my Cuttlebug out more often, cause the result is impressive.
Hope you liked it!!
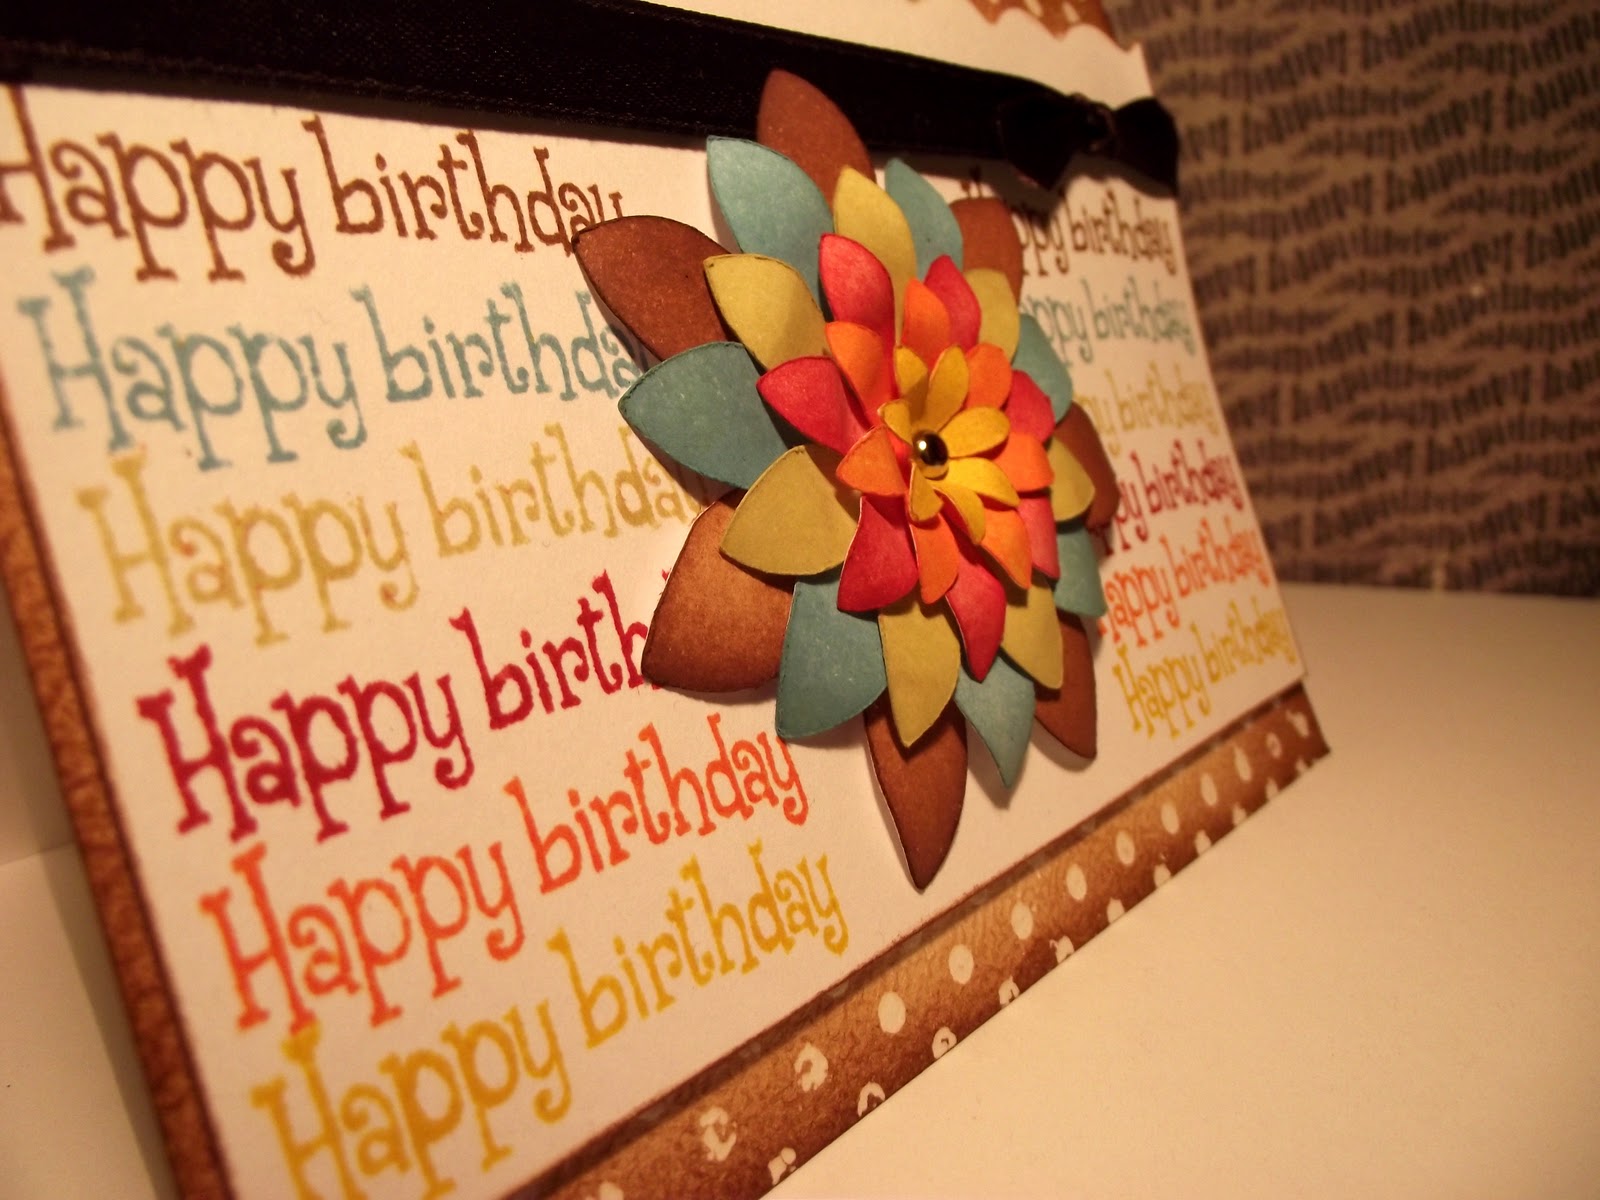
Hi everyone!
February is a month full of birthdays for me, so I have been very busy making cards and presents for everybody. Ill be sharing them all here, so here it goes the first card I made.
I first embossed with clear powder the polka dot background and distressed the card with vintage photo ink. Then I took a piece of white cardstock and stamp the greeting using rainbow colors of distress inks. I cut the flower with the silhouette on white cardstock, and paint each layer with the same distress inks as the greeting. Curl the petals using a paintbrush and keep it together with a brad. I tied the ribbon and used a scallop border punch on the card.
If you have any questions, please leave them in the comment section and Ill be happy to help.
I thought I could share here the card my husband made me for valentines day. It was his first card and he said he enjoyed it, so that's good. He did some embossing, distressing and stamping, so I was quite impressed.
What do you think?
Thanks for stopping by.
Hi!!!
I have been missing for a while, cause I had the worst scare of my life. I have been organizing all of my digital pics, cause they were a bit of a mess, and I decided to take all of them from the computers and put them on an external hard disk. The thing is, that once I had aaaaall of my pics together in just one place, the disk broke. I was terrified, cause I deleted all the other copies and if it couldnt get fixed, I would have lost all my pics from the last 7 years.
The computer guy was able to fix it, so now I have copies everywhere, and I decided that Im never going to be organized again, haha.
Anyway, enough about my dramas, and here is the card I made for my hubby for valentines day.
For this card, I used my silhoutte and white and black cardstock. I distress the white card using Tattered straw, Fired Brick and Black Soot Distress inks. I used some perfect pearls in the middle of the heart, and covered the heart with glossy accents to give it a bit of shine. I used some rhinestones for decoration, and it was done.
Hope you liked it and thanks for stopping by!!
Hi!
Today I have a different kind of post. I have been following this blog for a while now. She is amazing coloring, making her cards so vibrant and different. I wish I could colour like that, I guess maybe one day, with looooots of practice. Anyway, she has this great giveaway going on for Penny Black, and I thought I should, at least, give it a go. So check out her blog and the giveaway post!
Have a good weekend!
Hi everyone!
Today I´m sharing a card I made for one of my husband´s colleagues. As the card says, it was his 4th wedding anniversary, and he wanted a card for his wife. So here it is...
For this card I used a couple of different designs from the silhouette store. The background stamp is from Hero Arts, and I embossed it with clear embossing powder. I inked white cardstock with Fired Brick distress ink and then sprayed it with some pearl Perfect Pearls water (it adds a lovely shine), and used it for the message and the hearts. The ribbon and the flower were colored the same way.
The owls were cut in white cardstock, inked with Vintage Photo distress ink, and sprayed with the same pearlised water.
I used Glossy Accents for their eyes and the "4th", to add extra shine and dimension.
Hope you liked it!
Hiya!!!
A friend of mine is going to Madrid to check out some fashion week stuff. She is studying fashion design and she is loving it, so I decided to make her a card to wish her a good trip, inspired by this card I saw online. When I saw the great use she gave this die cut for the silhouette, I just had to try it!
I had a bit of trouble with the ribbon, as it didn´t want to work with glue. So I had to sew it together. It took a bit longer, but it was worth it.
As it turned out, she had a surprise for me too. She bought me some sizzix stuff over Christmas, but it took ages to get here, as she ordered it from America. I was SO happy when I saw all the packages!
So I´ll have to try them all soon!!
Hi everyone!
Did you have a nice weekend? I had quite a busy weekend, meeting lots of friends and having nice food. No crafting, but it was SO worth it!
Anyway, it is time to post another card. I made this spinner card for my husband´s boss.
This was a very simple card to make. I took the measurements from a tutorial online. Embossed the dots with my cuttlebug, so they would make a nice border for the spinner rose.
For the letters, I used chipboard letters. To make them shiny I first embossed them using silver embossing powder that contains glitter and then covered them with 2 layers of UTEE.
Hope you liked it!